Relearning MSX #12: Setting up the MSX-C environment (part 6)
Posted by Javi Lavandeira in How-to, MSX, Retro, Technology | January 17, 2015During the last few posts we’ve finished setting up the MSX-C environment and we’ve learnt how to use the AKID text editor. At this point we can already create and compile C programs, but the process is annoying because we have to run all the compiler steps by hand.
In this post we’re going to create a couple of batch files: one to set up some useful parameters in MSX-DOS2, and another to automate compilation of our C programs.

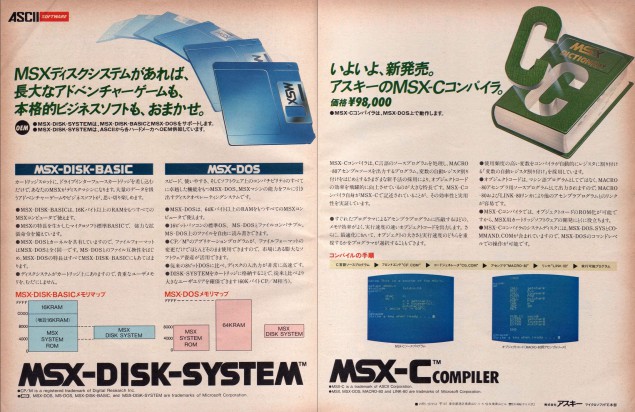
MSX-C ad from 1985. Yes, it was THAT expensive (MSX Magazine, May 1985)
AUTOEXEC.BAT
The first file we’re going to create is called AUTOEXEC.BAT, and it has to be created in the in the top directory of the boot disk (A:). If you used MS-DOS then you already know what it is.
When MSX-DOS2 boots it will read this file and run the commands in it one by one. This is the perfect place to put commands that we want to run every time that MSX-DOS2 starts.
Start your MSX computer (or your emulator), and open the AUTOEXEC.BAT file in AKID. This will create it if it didn’t exist before:
AKID A:¥AUTOEXEC.BAT
You may already have an AUTOEXEC.BAT if you copied it from the MSX-DOS2 disk back when we were installing MSX-DOS2. If that’s the case, then delete everything in the file because we’re writing it from scratch.
These are the commands that we’re going to add to A:\AUTOEXEC.BAT:
MSX-DOS2 prompt
The default MSX-DOS2 prompt is very simple and gives us very little information. It tells us about the drive we’re using, but nothing else. MSX-DOS2 supports the PROMPT environment variable: if it’s set to ON then it will show the current path in the prompt. This will save us headaches in the future.
The default MSX-DOS2 prompt (the same as in MSX-DOS). Not very informative.

Detailed MSX-DOS2 prompt with current path information
So, add this line to your AUTOEXEC.BAT file:
SET PROMPT ON
RAMDISK
Another useful feature of MSX-DOS2 is the RAMDISK. It allows the computer to use a part of its memory as if it was a hard drive, complete with its own drive letter (H:). Accessing the files in this disk is much, much faster than accessing them from the hard drive. However, the contents of the RAMDISK will disappear whenever we restart the computer.
We will create a RAMDISK and copy there the files we’ll use all the time: MSX-DOS2’s COMMAND2.COM, the text editor, and the several programs for each step of the compile process. This will make compilation much faster than if it was running from the hard drive. We’ll start with a 256 KB disk, which should be more than enough for now.
Add this to AUTOEXEC.BAT:
RAMDISK 256
MKDIR H:¥UTILS
COPY A:¥COMMAND2.COM H:¥
COPY A:¥UTILS¥AKID.COM H:¥UTILS
COPY A:¥UTILS¥M80.COM H:¥UTILS
COPY A:¥UTILS¥L80.COM H:¥UTILS
COPY A:¥UTILS¥CF.COM H:¥UTILS
COPY A:¥UTILS¥CG.COM H:¥UTILS
File search path
We have to tell MSX-DOS2 where it can find the programs we run on the comnd line. This is done by setting the environment variable PATH. The first thing we have to do is tell MSX-DOS2 that it should first search the H:\UTILS directory, and if the program isn’t there it should check A:\UTILS next.
We will also tell MSX-DOS2 that it should use the copy of COMMAND2.COM located in the RAMDISK, via the SHELL environment variable.
Add these lines:
SET PATH=H:¥UTILS;A:¥UTILS
SET SHELL=H:¥COMMAND2.COM
Temporary directory
Some programs written for MSX-DOS2 read the TEMP environment variable and use the directory it points to as a a location to store temporary files. Pointing this variable to a location in the RAMDISK will speed things up a bit:
MKDIR H:¥TMP
SET TEMP=H:¥TMP
MSX-C header files
MSX-C reads the INCLUDE environment variable to locate the C header files. We’ll point it to the INCLUDE directory in B:, which is where we put them:
SET INCLUDE=B:¥INCLUDE
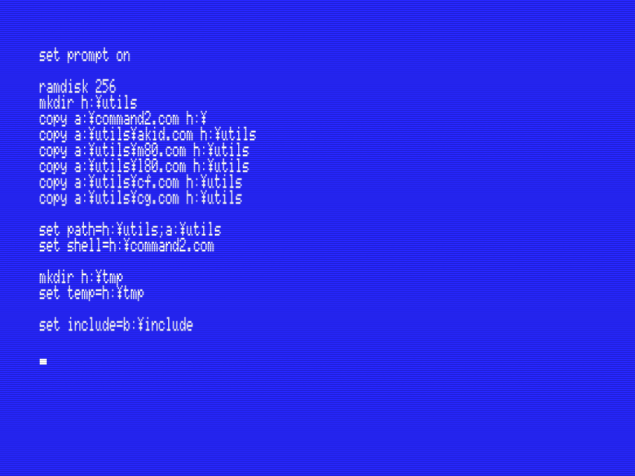
At this point your AUTOEXEC.BAT should look like this:

The AUTOEXEC.BAT file that we will use
If everything looks fine, save the file and let’s continue.
C.BAT
This is the batch file we will use to compile our programs. Create it in AKID under the A:\UTILS directory:
AKID A:¥UTILS¥C.BAT
The commands in this file are practically the same we saw when we compiled our test program by hand:
CF %2 %1
FPC %1 MLIB LIB
CG -K %3 %1
M80 =%1/Z
L80 B:¥LIB¥CK,%1,B:¥LIB¥MLIB/S,B:¥LIB¥CLIB/S,B:¥LIB¥CRUN/S,B:¥LIB¥CEND,%1/N/Y/E:xmain
Make sure that that xmain at the end of the last command is written in lower case. Your C.BAT file should look like this (the last line is long and is wrapped over, make sure that l80… and xmain are part of the same line):

C.BAT. The last line (l80…) is wrapped over!
Save the C.BAT file if it looks like in the screenshot. I won’t discuss these %1, %2 and %3 parameters for now.
FPC.COM is a component of MSX-C that we didn’t use when we compiled our hello world program. This is the Function Parameter Checker. It helps us confirm that we’re passing the right kind of parameters to each function. To do this it needs to locate those .TCO files that we saw when we installed MSX-C Library. FPC can only locate these files if they’re either in the current directory (which would be a mess), or if they’re in the same directory as FPC.COM. Let’s make sure that they are by copying them from the MSX-C Library directory to A:\UTILS. Run this command under MSX-DOS2:
COPY B:¥LIB¥*.TCO A:¥UTILS
…aaaaand we’re done
At this point your MSX-C setup is complete. You should be able to compile programs with a single command: C. Let’s try it out.
First, restart your MSX to make sure the environment variables are all properly set up and the binaries are copied to the RAMDISK.
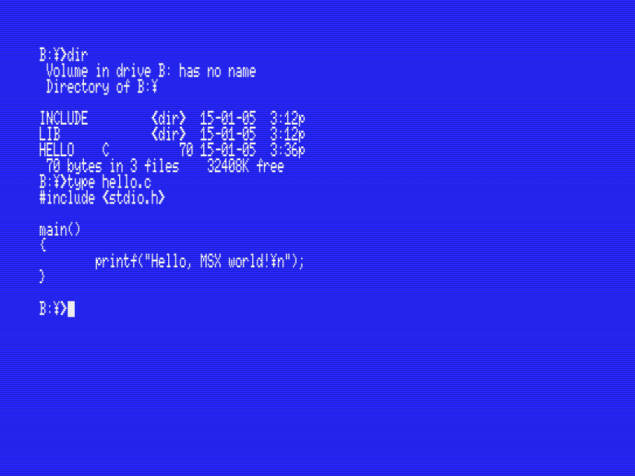
When the computer is up, go to wherever you put the HELLO.C file that we used for testing in chapter #8 of this series. Delete the temporary files and the HELLO.COM program if they’re still there. Make sure that you have only the HELLO.C program and that it looks like this:

Preparing to compile HELLO.C with the C.BAT script
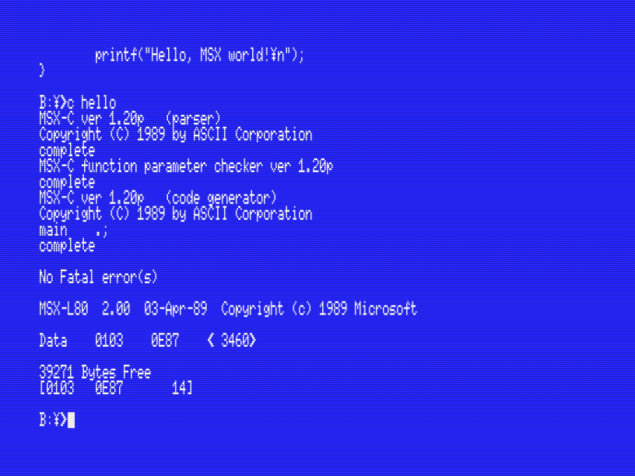
To compile the program using C.BAT just run the script giving it the name of the C file (without the extension):
C HELLO

Compiling HELLO.COM using C.BAT
And that’s it! Now we can compile C programs much more easily than when we ran the commands one by one. Try running the HELLO program in the command line, and it should run without issues.
If anything doesn’t work as expected, just ask in the comments below.
In the next post…
We’re now ready to compile C programs, so we’re going to start learning about MSX-C: its limitations and how it differs from standard C. If you haven’t learnt to program in C yet, this is your chance. If you already know C, you’ll learn how to port your programs so they’ll compile and run on an MSX.
This series of articles is supported by your donations. If you’re willing and able to donate, please visit the link below to register a small pledge. Every little amount helps.
Javi Lavandeira’s Patreon page

Pingback: ‘Relearning MSX’ Blog Series has been updated | Vintage is the New Old
Excellent series of tutorials. I’ve really enjoyed every article so far. Looking forward to the next instalment with relish!
Thanks very much!
awesome, bring part seven on :)
There you go. :-)
Hello,
Nice tutorial. I had problems with fpc.com, then I fixed it adding new lines to autoexec copying fpc and c.bat to H:\utils. I still have a warning message cannot open: [mlib.tco] but it is there!
Thanks
Hi Marcelo,
FPC requires that the .TCO files are either in the same directory as FPC.COM.
Try copying the .TCO files to H:\UTILS too and see if that fixes the problem. If it doesn’t then let me know and we’ll try and find a solution.
Javi
Hello how are you, excellent tutorial, I tell you I have a problem when I want to edit the autoexec.bat, it tells me that the unit can not be written, I calculate it is some disk protection, do you know how I can disable it to continue?
It could be a problem with permissions. Can you give us a bit more detail on the environment you’re using? Maybe a screenshot as well?
Hey, nice tutorial…. I just got started with MSX, just for curiosity
One thing I changed for know was the text editor, just found a version of vi for msxdos2… Thanks for sharing your knowlage