Relearning MSX #32: Other control structures in MSX-C
Posted by Javi Lavandeira in How-to, MSX, Retro, Technology | October 24, 2015In the previous post we learnt how to create loops in our programs using the statements for, while and do…while. Today we’re seeing the remaining control structures in C: break, goto, continue and switch.
Let’s get to it.
Aborting the execution of a loop: the break statement
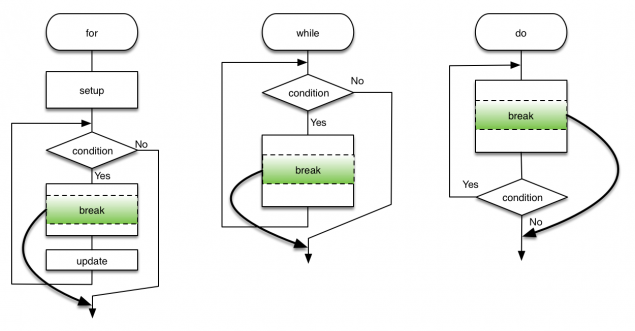
The break statement forcefully stops the execution of a loop, regardless of whether its condition passes or not. We use this when for any reason we want to exit from the loop without letting it run any more iterations.
The syntax is very simple, just enter the statement by itself followed by a semicolon:
break;
This is a diagram of break‘s operation:
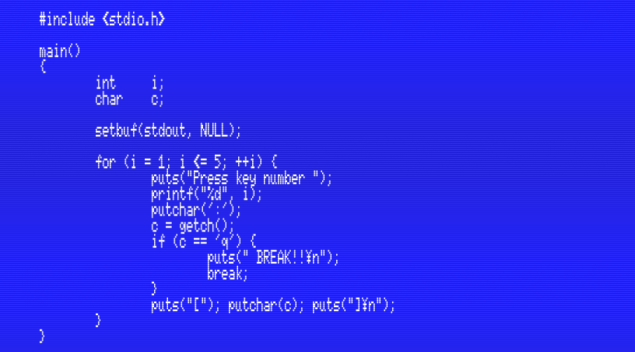
It’s easier to understand by seeing it in action. Take a look at this program:
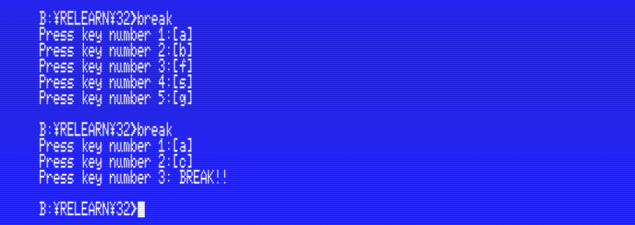
The program above contains a loop that asks the user to press a key on the keyboard five times. After five key presses the program ends. However, the loop also ends if the user presses ‘q’:
Skip only one iteration of the loop: the continue statement
The continue statement is very similar to break, and the syntax is very simple as well:
continue;
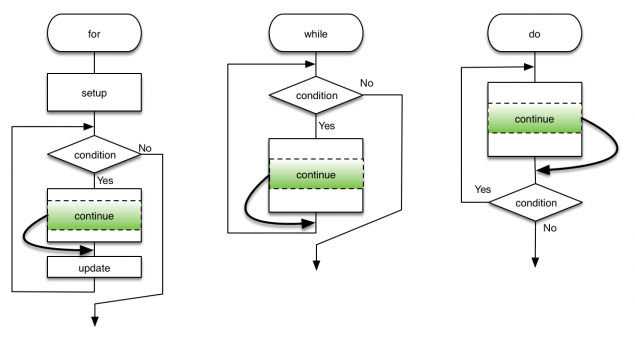
The difference with break is that continue only cancels the current iteration of the loop, instead of aborting it completely. This is the flowchart:
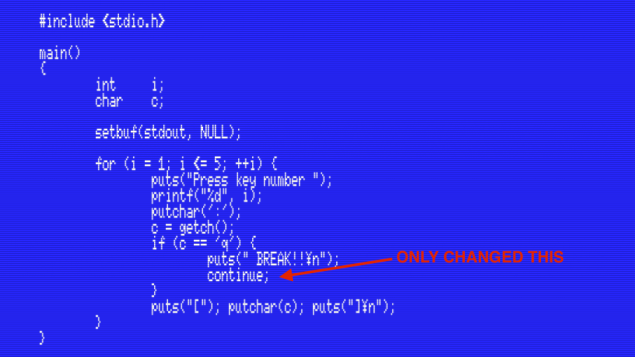
Unlike break, continue allows the loop to keep running as long as the condition is true. Modifying the previous program to use continue instead of break makes it easy to see this behaviour:
Now every time you type a ‘q’ the program still prints “BREAK!”, but the loop keeps running:
Exit from nested loops: the goto statement
We’ve seen that we can exit from loops using break or continue, but both of these have the same limitation: they don’t work well when we want to exit from nested loops, because they can only abort the innermost one. Let’s see an example:
In the example above the break statement is inside the green loop, which it is itself inside the orange loop. This break can be used to abort the green loop, but it won’t affect the orange one. In other words, we can’t use break to abort two or more nested loops at the same time.
To handle this situation we can use the goto keyword. goto tells the program to continue executing from an arbitrary location in the code. This is slightly different from what we’ve seen so far in the sense that it needs two parts:
- A label that marks a location in our program
- The goto statement itself telling the program to continue executing from the label
We can create a label in our code like this:
label_name: statement;
Label names follow the same rules as variable names: they can contain upper and lower case leters and the underscore character. This name is just an indicator for the convenience of the programmer, so they can be called anything you want.
We use the goto statement by telling it the name of the label we want our program to jump to:
goto label_name;
The label can be anywhere in our code, but a goto statement and the label it calls must always be inside the same function.
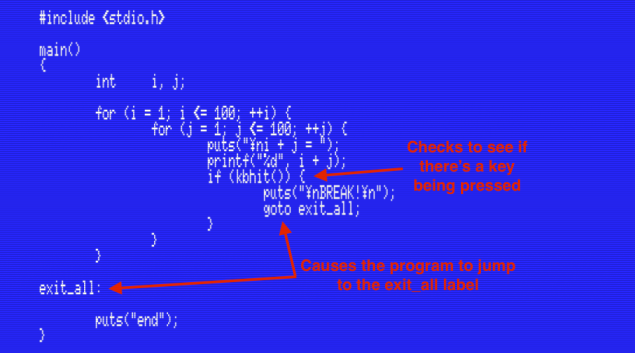
Let’s see an example of how to exit two nested loops using goto. The program below uses a new function that we haven’t seen before: kbhit(). This function checks whether there’s a key being pressed. You may remember that the functions getch() and getche() also check the keyboard. The difference is that kbhit() doesn’t stop the program in order to wait for the user to press a key. It just returns true or false depending on whether there’s a key being pressed or not. Here’s the program:
Just looking at the code you can already figure out what it does: it runs two nested loops, each of them counting from 1 to 100. The innermost loop prints the sum of both numbers. Also in the innermost loop there’s an if statement that checks the keyboard and jumps to the exit_all label if there’s a key pressed.
Try running the program and you’ll see that it keeps printing the sum of both loop variables until you press a key. Pressing a key makes the program print the string “BREAK!” from inside the loop, and then immediately jump to the exit_all label and print the string “end” before the program finishes:
Testing against a list of values: the switch statement
The last control structure in C we haven’t seen yet is the switch statement. We use switch to choose one action from a list of several depending on the value of an expression.
This is the general format of a switch statement:
switch (expresssion) {
    case constant_value_1:
        statement;
        [more optional statements]
    case constant_value_2:
        statement;
        [more optional statements]
    [more optional case clauses]
    default:
        statement;
        [more optional statements]
}
The first thing a switch statement does is evaluate the value of expression. Next it compares this value against each constant_value in the list, and if it finds one that matches then it runs all the code that follows. If it doesn’t find a value that matches then it jumps to the default label, if it exists.
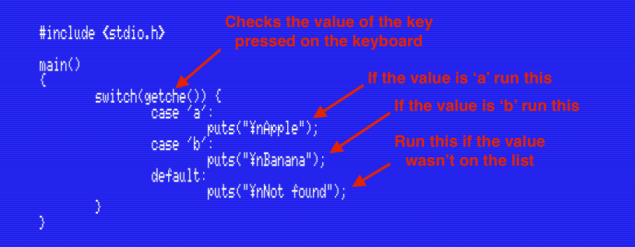
It’s better to show an example program:
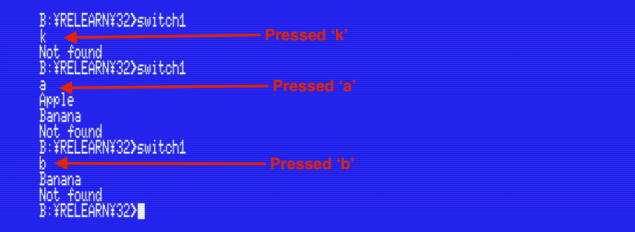
Compile and run the program and experiment a bit with it to understand how a switch…case works:
- Pressing ‘a’ on the keyboard causes the program to print “Apple”, “Banana” and “Not found” on the screen.
- Pressing ‘b’ prints “Banana” and “Not found”
- Pressing any other key prints only “Not found”
The reason for this is that each case clause inside the switch statement acts as a label. When the program finds a matching value it jumps to that label and continues executing from that point.
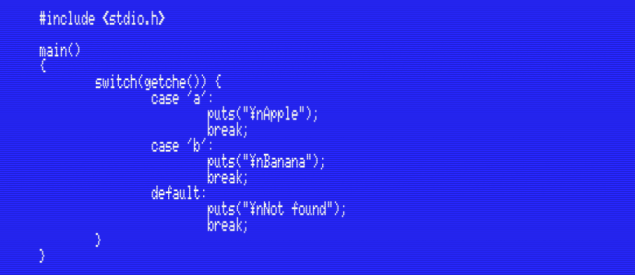
Sometimes we’re happy with this behaviour, but in most situations, instead of running all the code below a label we want to run just the code that matches that especific value and nothing else. In this situation we can use break to exit from the switch:
Compile and run the program and you’ll see that now it behaves as expected:
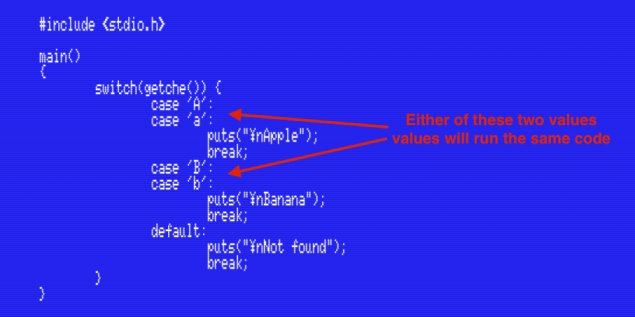
Sometimes we’ll also need to run the same code for different values. Instead of duplicating the code we can just modify the program above to print “Apple” if the user enters a lowercase or uppercase A on the keyboard. We achieve this by entering two or more labels together followed by the code we want to run with them, like this:
Now the program is more user-friendly than before because it accepts both upper and lowercase entry:
Summary
In this post we’ve seen how to break out of a loop using break, how to stop a single iteration of a loop while letting it to keep running with continue, and we’ve learnt to exit nested loops using the goto statement. We’ve also learnt how to use the switch statement.
This completes our study of the control structures in the C programming language.
In the next post…
So far we’ve been using decimal numbers in our programs. In the next few posts we will learn how to use other bases such as hexadecimal and octal, and we’ll see how the computer stores numbers in memory.
This series of articles is supported by your donations. If you’re willing and able to donate, please visit the link below to register a small pledge. Every little amount helps.
Javi Lavandeira’s Patreon page


